Hello Readers,
First of all let me thank you, for your time, you will be investing in reading this post. And as this is a long post, I appreciate your patience as the information documented here is very important and helps you Design/Configure/Troubleshoot/Maintain your VMware environment accordingly.
So many times during discussion I came across a situation where power outage happened in the environment and everything went down completely or partially. Now this really depends on the configuration and design you have opted on the Network side of things when you lost the connectivity to your Management Network (either to Service Console - ESX 3.x, ESX 4.x or to vmkernel post ESXi 5.x).
As this is a long post I appreciate your patience as the information documented here is very important and helps you design your environment accordingly.
The purpose of this article is to simulate a condition with which you can test the redundancy of your service console/vmkernel used for carrying the Management Network.
Assumptions made before we proceed:
1) Here I am making an assumption that the configuration on the ESX/ESXi host with atleast two uplinks for redundancy either in NIC Teaming or only have one uplink or more than one uplinks on one vSwitch/VDS or having a second vSwitch/dvportgroup on VDS configured wither either 1 or 2 uplinks.
2) Both NICs are either connected to one physical switch or if connected to two separate physical switches then both uplink switches are connected at L2 using any workable technologies such as vPC, MLAG, SMTL etc. etc.
3) vSwitch port group or VDS dvportgroup are configured with correct Load Balancing policies which corresponds to the configuration on the uplink physical switches
4) Environment is not running any Production workload and it could be Dev/Test/Lab so that no impact on the running Production VMs.
5) The default gateway is reachable from ESX/ESXi
6) If more than one isolation address is required on the Cluster/Host then necessary configuration is done on ESX/ESXi
7) Physical connectivity is configured properly for each ESX/ESXi host irrespective of hardware and other components necessary.
8) ESX/ESXi host is configured to use any of the available tools such as SSH (putty)/DCUI/ILO/DRAC/RSA/KVM etc.
9) All the network cables which are used for providing an uplink/s to ESX/ESXi host are identified properly and marked/documented properly on both ESX/ESXi and physical Switch/es Side.
10) Familiarity with vSphere Networking and use of the necessary commands where not listed.
11) Make changes at the vSwitch level only when you a separate vSwitch configured for Management Network with a different uplink or if using VDS you should have a different dvportgroup configured for Management Network.
1st Method
You can go into VSS port group settings and go to NIC teaming Tab where you can see the two uplinks in Active Active, check mark the box Override failover order, select one of the NICs from the Tea, select the arrow Move Down and click it twice so the NIC will be moved to Unused state from Active state
At this time the vSwitch/VDS will still shows both NICs as Active/Active state. Once you move the NIC into unused state you will see the Management Network will have only one uplink and you will received the warning under the Summary Tab "Host currently has no management network redundancy".
Now HA may also gives you an error but related information is not under the scope of this article and user should be aware about the impact and able to recover if needed.
Note: If the warning continues to appear, disable and re-enable VMware High Availability/FDM (depending on the version of ESX/ESXi in the Cluster.
To set das.ignoreRedundantNetWarning to true (for ESX 3.x and 4.x):
1. From the VMware Infrastructure Client, right-click on the cluster and click Edit Settings.
2. Select vSphere HA and click Advanced Options.
3. In the Options column, enter das.ignoreRedundantNetWarning
4. In the Value column, type true.
Note: Steps 3 and 4 create a new option.
5. Click OK.
6. Right-click the host and click Reconfigure for vSphere HA. This reconfigures HA.
To set das.ignoreRedundantNetWarning to true in the vSphere 5.1 Web Client:
1. From the vSphere Web Client, right click on the cluster.
2. Click on the Manage tab for the cluster, then under Settings click vSphere HA.
3. Click on the Edit button in the top right corner.
4. Expand the Advanced Options section, and click Add.
5. In the Options column, type das.ignoreRedundantNetWarning.
6. In the Value column, type true.
7. Click OK.
8. Right-click the host and click Reconfigure for vSphere HA.
2nd Method
If you do not have access through vSphere client or Web Client then you can set the NIC to unused state using command line through ssh session to the ESX/ESXi hos. Now this command will move the NIC into unsed state for the whole vSwitch or VDS and will NOT make change at the particular port group (VSS) or dvport group (VDS) level.
If using vSwitch (VSS)
#esxcfg-vswitch -U vmnicX vSwitchX
(Note: Replace X with the actual NIC number and vSwitch Number)
For ESXi 5.x
Remove network card (known as vmnics) to or from a Standard vSwitch using these commands:
#esxcli network vswitch standard uplink remove --uplink-name=vmnic --vswitch-name=vSwitch
Change the link status of one of the uplinks vmnic with one of these commands:
#esxcli network nic down -n vmnicX
If using VDS
To get the dvport ID for the dvportgroup
#esxcfg-vswitch -l | more
To unlink the uplink from VDS
#esxcfg-vswitch -Q vmnicX -V dvPort_ID_of_vmnic dvSwitch
3rd Method
For ESX/ESXi 3.x/4.x, ESXi 5.0 you can change the VLAN property on the VSS/VDS which carries the Management Network though SSH/DCUI
#esxcfg-vswitch -v -p “Service Console” vSwitch0
(Note: for ESXi 5.1 the rollback feature won't allow you to make such change due to which the ESXi host may get disconnected from vCenter server but you can still try the command as we have one uplink still available)
4th Method
You can change the load balancing policy using the command line as well for the vSwitch where the Management Network is configured using Service Console or vmkernel and we are using only one vSwitch with one uplink and have a 2nd vSwitch configured separately with 2nd Management Network (Service Console/VMkernel) with one uplink.
Here you have to use a different teaming policy than the physical switch which results in to loss of Network connectivity on the uplink/s used for Management Network VSS/dvportgroup.
Run the command on ESX/ESXi 3.x/4.x:
#vim-cmd /hostsvc/net/vswitch_setpolicy --nicteaming-policy='loadbalance_ip' vSwitch0
To change the load balancing policy on an ESXi 5.x host, run this command:
#esxcli network vswitch standard policy failover set -l iphash -v vSwitch0
* To change the load balancing policy to a route based on the originating virtual port ID, run this command:
#vim-cmd /hostsvc/net/vswitch_setpolicy --nicteaming-policy='loadbalance_srcid' vSwitch0
* To change the load balancing policy to a route based on the MAC hash, run this command:
#vim-cmd /hostsvc/net/vswitch_setpolicy --nicteaming-policy='loadbalance_srcmac' vSwitch0
Or
#Set load balancing policy. The options are:
* Port ID = loadbalance_srcid
* IP Hash = loadbalance_ip
* MAC = loadbalance_srcmac
* Failover Only = failover_explicit
Here is an example command:
#vimsh -n -e "hostsvc/net/vSwitch_setpolicy --nicteaming-policy loadbalance_iphash vSwitch#"
Refresh network settings with the command:
#vimsh -n -e "/internalsvc/refresh_network"
Restart the management service with the command:
#service mgmt-vmware restart
On ESXi 5.x,
* To change the load balancing policy to a route based on the originating virtual port ID, run this command:
#esxcli network vswitch standard policy failover set -l portid -v vSwitch0
* To change the load balancing policy to a route based on the MAC hash, run this command:
#esxcli network vswitch standard policy failover set -l mac -v vSwitchX
* To change the load balancing policy to a route based on the IP hash, run this command:
#esxcli network vswitch standard policy failover set -l iphash -v vSwitchX
Restart the management service with the command:
#/etc/init.d/hostd restart
5th Method
Using Cisco CDP protocol find out the uplink switch port (assuming the uplink switch/es are Cisco branded), access the uplink switch using SSH and go to the port configuration for one of the NIC which is used as an uplink for Management Network, and just shut the port down administratively.
You can click on the small Blue icon right beside the vmnic to find out the CDP information as shown in the attachment.
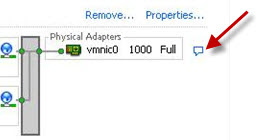
You will see red X against the NIC which is disconnected in vSphere client which means the link is down.
Using the command "esxcfg-nics -l" will show you the Link is down for that particular NIC as well.
6th Method
By changing the MTU for the portgorup/dvportgorup used for Service Console/vmkernel Management Network
For ESX/ESXi 3.x/4.x if the MTU value selected is Default of 1500 then use the command and use the commands if the configuration is vice versa.
Find out the vmkernel or Service Console first using the command/s.
#esxcfg-vswif -l
#esxcfg-vmknic -l
Find out the port group/dvportgroup name from the out put of the above command/s.
# esxcfg-vmknic -m 9000 portgroup_name
Run this command for ESXi 5.x:
# esxcli network ip interface set -m 9000 -i vmk_interface
7th Method (Need more testing)
Once you connect to the ESX/ESXi host using SSH (putty) or any other tools and use the following command which will blink the NIC for 5-6 seconds.
#ethtool -p vmnicX
8th Method
You can actually pull the cable from the back of the physical ESX/ESXi host which is carrying the Management Traffic so you need to have the information about the port mapping and related cable used for port/s used for Management Network on VSS/VDS.
9th Method
Warning: Using vsish interface which is currently NOT SUPPORTED by VMware so be careful when using it.
To block a particular link for a certain NIC of the vmkernel, run this command:
vsish -e set /net/pNics/vmnicX/block 1
All the above methods basically isolating the uplink connectivity for one NIC which in turn should break the redundancy status for the Management Network and the host should stay connected inside Virtual Center Server/ vCenter Server.
Enjoy the information and test out your Management Network properly and DO NOT use Production Host/s to test out the above methods.
Share and Care !!
Cheers !!
First of all let me thank you, for your time, you will be investing in reading this post. And as this is a long post, I appreciate your patience as the information documented here is very important and helps you Design/Configure/Troubleshoot/Maintain your VMware environment accordingly.
So many times during discussion I came across a situation where power outage happened in the environment and everything went down completely or partially. Now this really depends on the configuration and design you have opted on the Network side of things when you lost the connectivity to your Management Network (either to Service Console - ESX 3.x, ESX 4.x or to vmkernel post ESXi 5.x).
As this is a long post I appreciate your patience as the information documented here is very important and helps you design your environment accordingly.
The purpose of this article is to simulate a condition with which you can test the redundancy of your service console/vmkernel used for carrying the Management Network.
Assumptions made before we proceed:
1) Here I am making an assumption that the configuration on the ESX/ESXi host with atleast two uplinks for redundancy either in NIC Teaming or only have one uplink or more than one uplinks on one vSwitch/VDS or having a second vSwitch/dvportgroup on VDS configured wither either 1 or 2 uplinks.
2) Both NICs are either connected to one physical switch or if connected to two separate physical switches then both uplink switches are connected at L2 using any workable technologies such as vPC, MLAG, SMTL etc. etc.
3) vSwitch port group or VDS dvportgroup are configured with correct Load Balancing policies which corresponds to the configuration on the uplink physical switches
4) Environment is not running any Production workload and it could be Dev/Test/Lab so that no impact on the running Production VMs.
5) The default gateway is reachable from ESX/ESXi
6) If more than one isolation address is required on the Cluster/Host then necessary configuration is done on ESX/ESXi
7) Physical connectivity is configured properly for each ESX/ESXi host irrespective of hardware and other components necessary.
8) ESX/ESXi host is configured to use any of the available tools such as SSH (putty)/DCUI/ILO/DRAC/RSA/KVM etc.
9) All the network cables which are used for providing an uplink/s to ESX/ESXi host are identified properly and marked/documented properly on both ESX/ESXi and physical Switch/es Side.
10) Familiarity with vSphere Networking and use of the necessary commands where not listed.
11) Make changes at the vSwitch level only when you a separate vSwitch configured for Management Network with a different uplink or if using VDS you should have a different dvportgroup configured for Management Network.
1st Method
You can go into VSS port group settings and go to NIC teaming Tab where you can see the two uplinks in Active Active, check mark the box Override failover order, select one of the NICs from the Tea, select the arrow Move Down and click it twice so the NIC will be moved to Unused state from Active state
At this time the vSwitch/VDS will still shows both NICs as Active/Active state. Once you move the NIC into unused state you will see the Management Network will have only one uplink and you will received the warning under the Summary Tab "Host
Now HA may also gives you an error but related information is not under the scope of this article and user should be aware about the impact and able to recover if needed.
Note: If the warning continues to appear, disable and re-enable VMware High Availability/FDM (depending on the version of ESX/ESXi in the Cluster.
To set das.ignoreRedundantNetWarning to true (for ESX 3.x and 4.x):
1. From the VMware Infrastructure Client, right-click on the cluster and click Edit Settings.
2. Select vSphere HA and click Advanced Options.
3. In the Options column, enter das.ignoreRedundantNetWarning
4. In the Value column, type true.
Note: Steps 3 and 4 create a new option.
5. Click OK.
6. Right-click the host and click Reconfigure for vSphere HA. This reconfigures HA.
To set das.ignoreRedundantNetWarning to true in the vSphere 5.1 Web Client:
1. From the vSphere Web Client, right click on the cluster.
2. Click on the Manage tab for the cluster, then under Settings click vSphere HA.
3. Click on the Edit button in the top right corner.
4. Expand the Advanced Options section, and click Add.
5. In the Options column, type das.ignoreRedundantNetWarning.
6. In the Value column, type true.
7. Click OK.
8. Right-click the host and click Reconfigure for vSphere HA.
2nd Method
If you do not have access through vSphere client or Web Client then you can set the NIC to unused state using command line through ssh session to the ESX/ESXi hos. Now this command will move the NIC into unsed state for the whole vSwitch or VDS and will NOT make change at the particular port group (VSS) or dvport group (VDS) level.
If using vSwitch (VSS)
#esxcfg-vswitch -U vmnicX vSwitchX
(Note: Replace X with the actual NIC number and vSwitch Number)
For ESXi 5.x
Remove network card (known as vmnics) to or from a Standard vSwitch using these commands:
#esxcli network vswitch standard uplink remove --uplink-name=vmnic --vswitch-name=vSwitch
Change the link status of one of the uplinks vmnic with one of these commands:
#esxcli network nic down -n vmnicX
If using VDS
To get the dvport ID for the dvportgroup
#esxcfg-vswitch -l | more
To unlink the uplink from VDS
#esxcfg-vswitch -Q vmnicX -V dvPort_ID_of_vmnic dvSwitch
3rd Method
For ESX/ESXi 3.x/4.x, ESXi 5.0 you can change the VLAN property on the VSS/VDS which carries the Management Network though SSH/DCUI
#esxcfg-vswitch -v
(Note: for ESXi 5.1 the rollback feature won't allow you to make such change due to which the ESXi host may get disconnected from vCenter server but you can still try the command as we have one uplink still available)
4th Method
You can change the load balancing policy using the command line as well for the vSwitch where the Management Network is configured using Service Console or vmkernel and we are using only one vSwitch with one uplink and have a 2nd vSwitch configured separately with 2nd Management Network (Service Console/VMkernel) with one uplink.
Here you have to use a different teaming policy than the physical switch which results in to loss of Network connectivity on the uplink/s used for Management Network VSS/dvportgroup.
Run the command on ESX/ESXi 3.x/4.x:
#vim-cmd /hostsvc/net/vswitch_setpolicy --nicteaming-policy='loadbalance_ip' vSwitch0
To change the load balancing policy on an ESXi 5.x host, run this command:
#esxcli network vswitch standard policy failover set -l iphash -v vSwitch0
* To change the load balancing policy to a route based on the originating virtual port ID, run this command:
#vim-cmd /hostsvc/net/vswitch_setpolicy --nicteaming-policy='loadbalance_srcid' vSwitch0
* To change the load balancing policy to a route based on the MAC hash, run this command:
#vim-cmd /hostsvc/net/vswitch_setpolicy --nicteaming-policy='loadbalance_srcmac' vSwitch0
Or
#Set load balancing policy. The options are:
* Port ID = loadbalance_srcid
* IP Hash = loadbalance_ip
* MAC = loadbalance_srcmac
* Failover Only = failover_explicit
Here is an example command:
#vimsh -n -e "hostsvc/net/vSwitch_setpolicy --nicteaming-policy loadbalance_iphash vSwitch#"
Refresh network settings with the command:
#vimsh -n -e "/internalsvc/refresh_network"
Restart the management service with the command:
#service mgmt-vmware restart
On ESXi 5.x,
* To change the load balancing policy to a route based on the originating virtual port ID, run this command:
#esxcli network vswitch standard policy failover set -l portid -v vSwitch0
* To change the load balancing policy to a route based on the MAC hash, run this command:
#esxcli network vswitch standard policy failover set -l mac -v vSwitchX
* To change the load balancing policy to a route based on the IP hash, run this command:
#esxcli network vswitch standard policy failover set -l iphash -v vSwitchX
Restart the management service with the command:
#/etc/init.d/hostd restart
5th Method
Using Cisco CDP protocol find out the uplink switch port (assuming the uplink switch/es are Cisco branded), access the uplink switch using SSH and go to the port configuration for one of the NIC which is used as an uplink for Management Network, and just shut the port down administratively.
You can click on the small Blue icon right beside the vmnic to find out the CDP information as shown in the attachment.

You will see red X against the NIC which is disconnected in vSphere client which means the link is down.
Using the command "esxcfg-nics -l" will show you the Link is down for that particular NIC as well.
6th Method
By changing the MTU for the portgorup/dvportgorup used for Service Console/vmkernel Management Network
For ESX/ESXi 3.x/4.x if the MTU value selected is Default of 1500 then use the command and use the commands if the configuration is vice versa.
Find out the vmkernel or Service Console first using the command/s.
#esxcfg-vswif -l
#esxcfg-vmknic -l
Find out the port group/dvportgroup name from the out put of the above command/s.
# esxcfg-vmknic -m 9000 portgroup_name
Run this command for ESXi 5.x:
# esxcli network ip interface set -m 9000 -i vmk_interface
7th Method (Need more testing)
Once you connect to the ESX/ESXi host using SSH (putty) or any other tools and use the following command which will blink the NIC for 5-6 seconds.
#ethtool -p vmnicX
8th Method
You can actually pull the cable from the back of the physical ESX/ESXi host which is carrying the Management Traffic so you need to have the information about the port mapping and related cable used for port/s used for Management Network on VSS/VDS.
9th Method
Warning: Using vsish interface which is currently NOT SUPPORTED by VMware so be careful when using it.
To block a particular link for a certain NIC of the vmkernel, run this command:
vsish -e set /net/pNics/vmnicX/block 1
All the above methods basically isolating the uplink connectivity for one NIC which in turn should break the redundancy status for the Management Network and the host should stay connected inside Virtual Center Server/ vCenter Server.
Enjoy the information and test out your Management Network properly and DO NOT use Production Host/s to test out the above methods.
Share and Care !!
Cheers !!

